Appearance
Operations
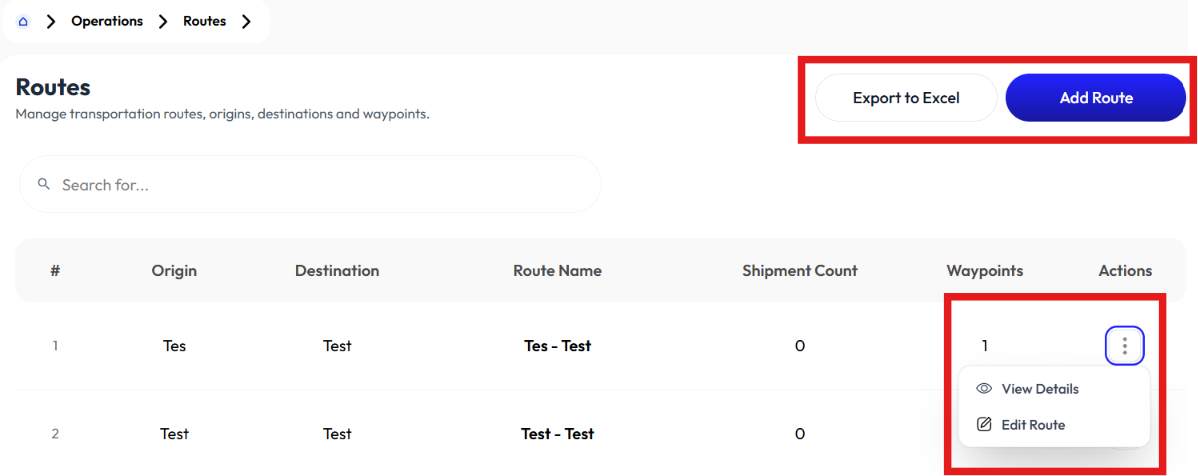
Routes
- User creates routes using the Add Route button.
- User displays route content by clicking on Details
- User modify information using the Edit button.
- User exports to excel
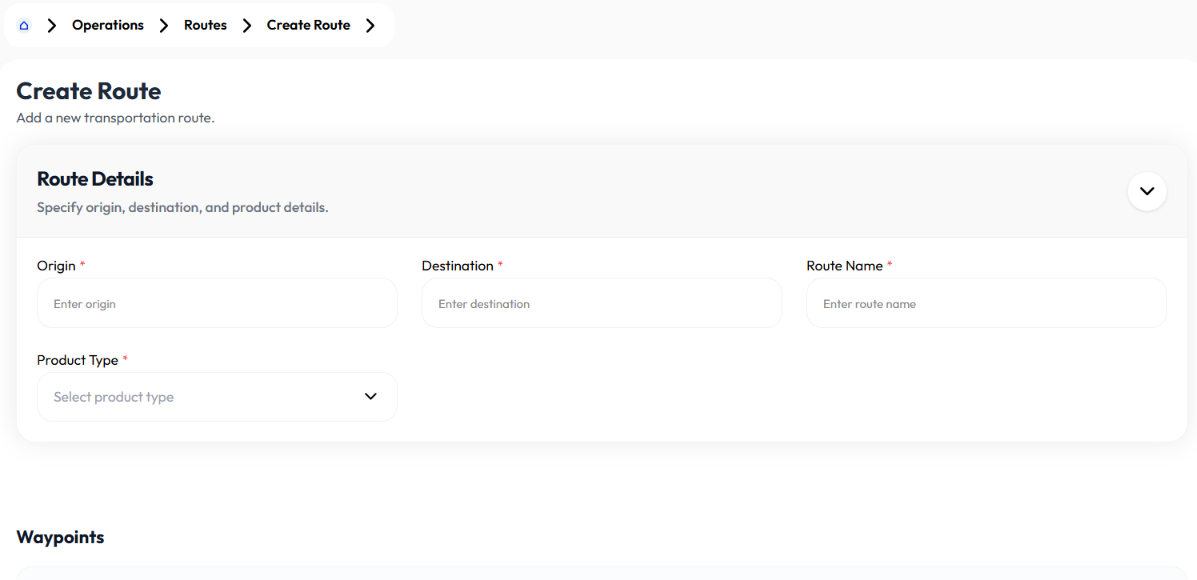
Add Route
- Click add route button
- Enter origin
- Enter destination
- Enter route name
- Select product type (inbound, outbound, site transfer)
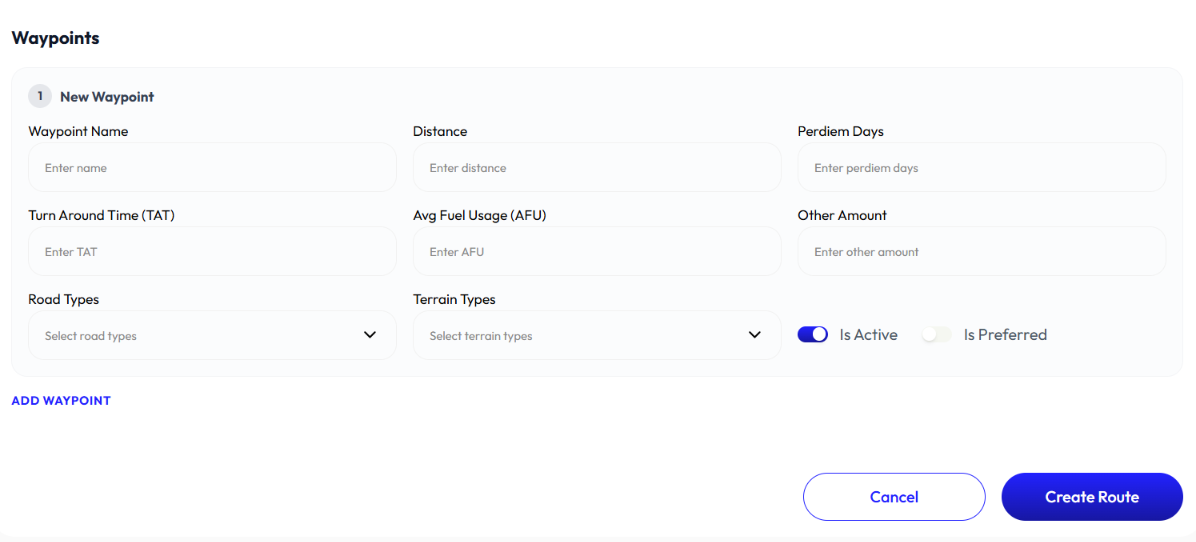
- Click add waypoint to add more waypoints
- Enter waypoint name
- Enter distance
- Enter per diem days
- Enter turn around time
- Enter average fuel usage
- Enter other amount
- Select is active on or off
- Select is preferred on or off
- Select road types. To add road type check Add Road Type
- Select terrain types. To add terrain type check Add Terrain Type
- Click remove waypoint to remove waypoint
- Click create route
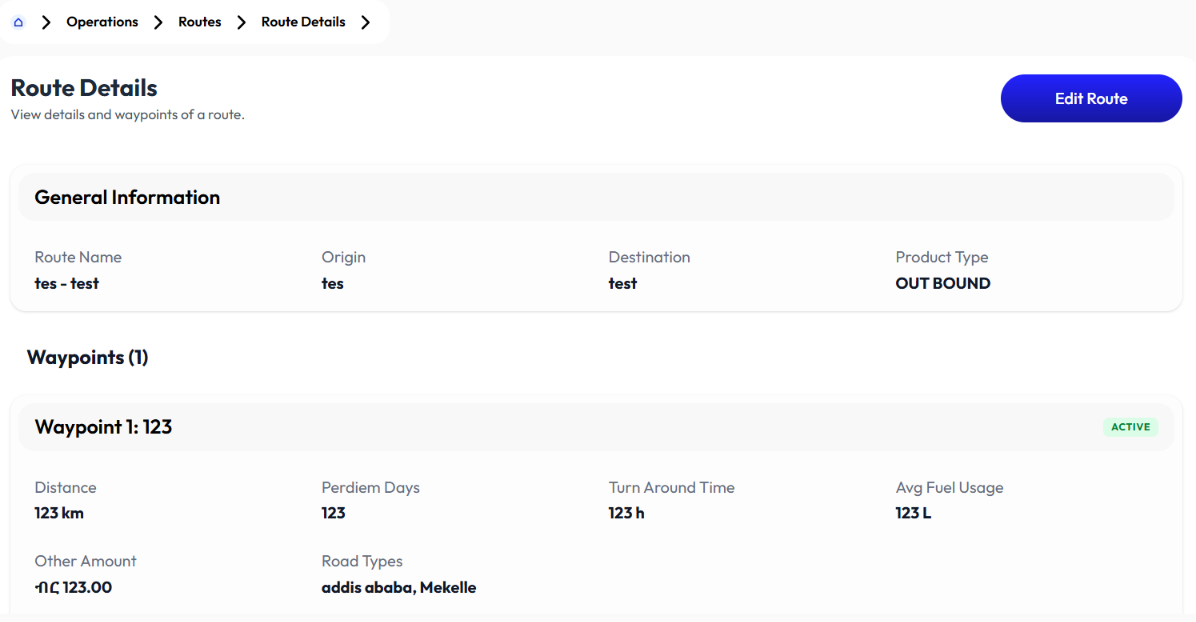
Detail Route
Click on a route to display:
- route information
- waypoints
Edit Route
- Click action button
- Click edit
- Update origin
- Update destination
- Update route name
- Select product type (inbound, outbound, site transfer)
- Click add waypoint to add more waypoints
- Update name
- Update distance
- Update per diem days
- Update turn around time
- Update average fuel usage
- Update other amount
- Select is active on or off
- Select is preferred on or off
- Select road types. To add road type check Add Road Type
- Select terrain types. To add terrain type check Add Terrain Type
- Click remove waypoint to remove waypoint
- Click submit
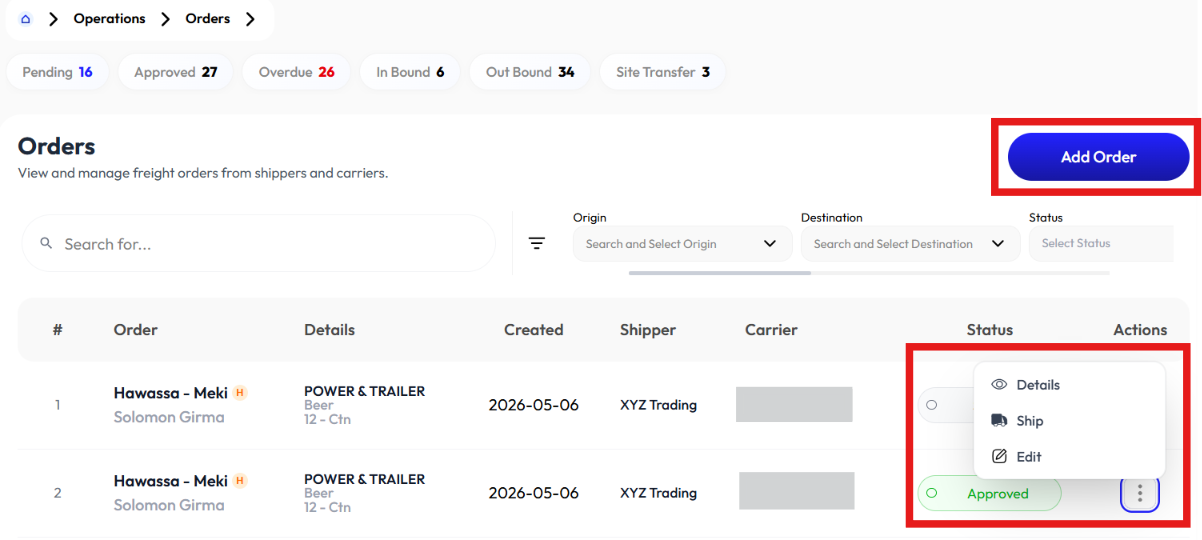
Orders
- User adds order using the Add Order button.
- User sees information using Detail button.
- User modifies information using the Edit button.
- User either ships or rejects an order on the Action.
- User searches for orders by inputting the order code inside the search bar.
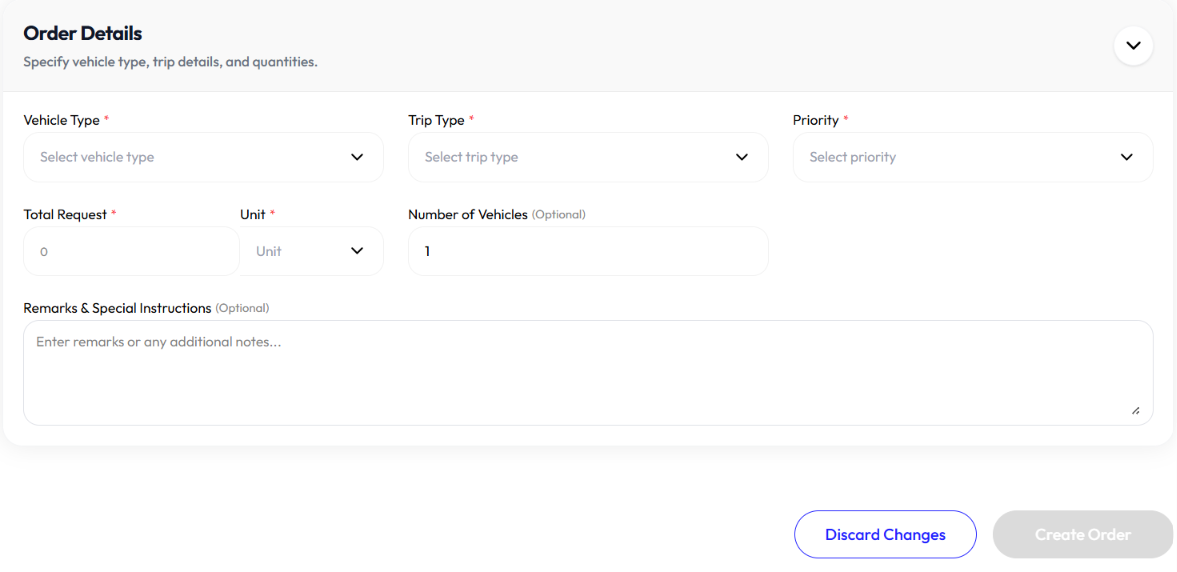
Add Order
- Click add order button
- Select shipper. To add shipper check Add Customer
- Select route. To add routes check Add Route
- Select product type
- Select commodity
- Select packaging
- Select trip type (single trip, round trip)
- Select vehicle type. To add vehicle type check Add Vehicle Type
- Select priority (urgent, high, medium, low)
- Enter total request
- Enter number of vehicles
- Enter remark (optional)
- Click create order

Detail Order
- Click on an order to display detail information

Edit Order
- Click action button
- Click edit
- Select shipper. To add shipper check Add Customer
- Select route. To add routes check Add Route
- Select product type
- Select commodity
- Select packaging
- Select trip type (single trip, round trip)
- Select vehicle type. To add vehicle type check Add Vehicle Type
- Select priority (urgent, high, medium, low)
- Update total request
- Update number of vehicles (optional)
- Update remark (optional)
- Click submit
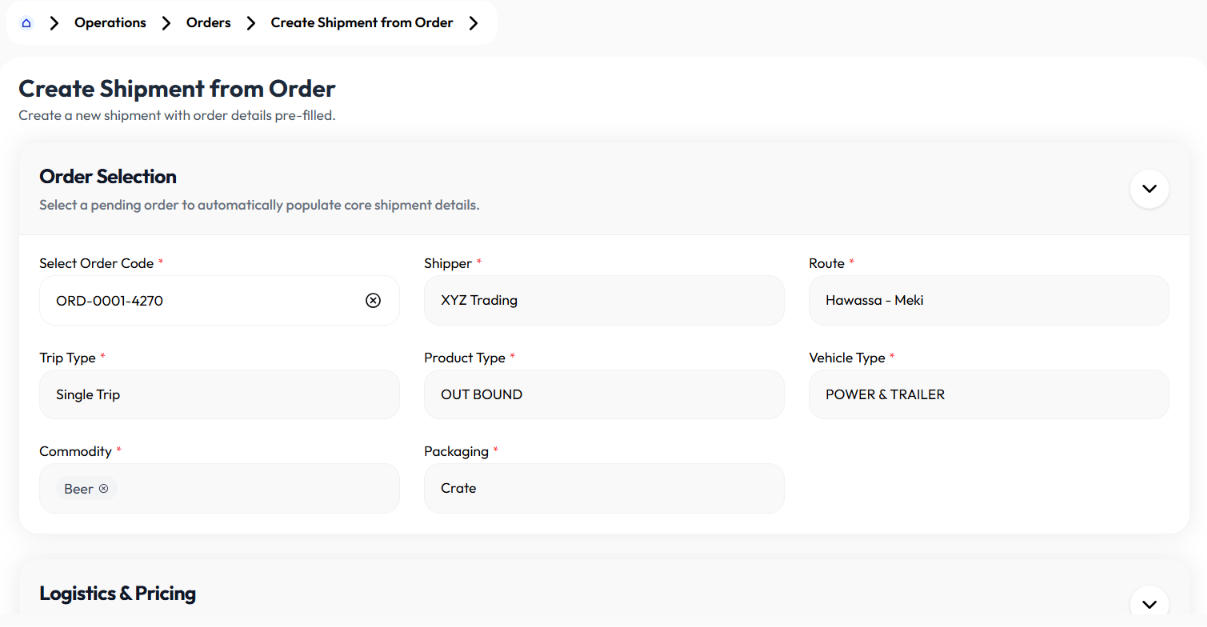
Order Action
- Click ship button to mark it shipped
- Click reject button to mark it rejected
- if Ship:
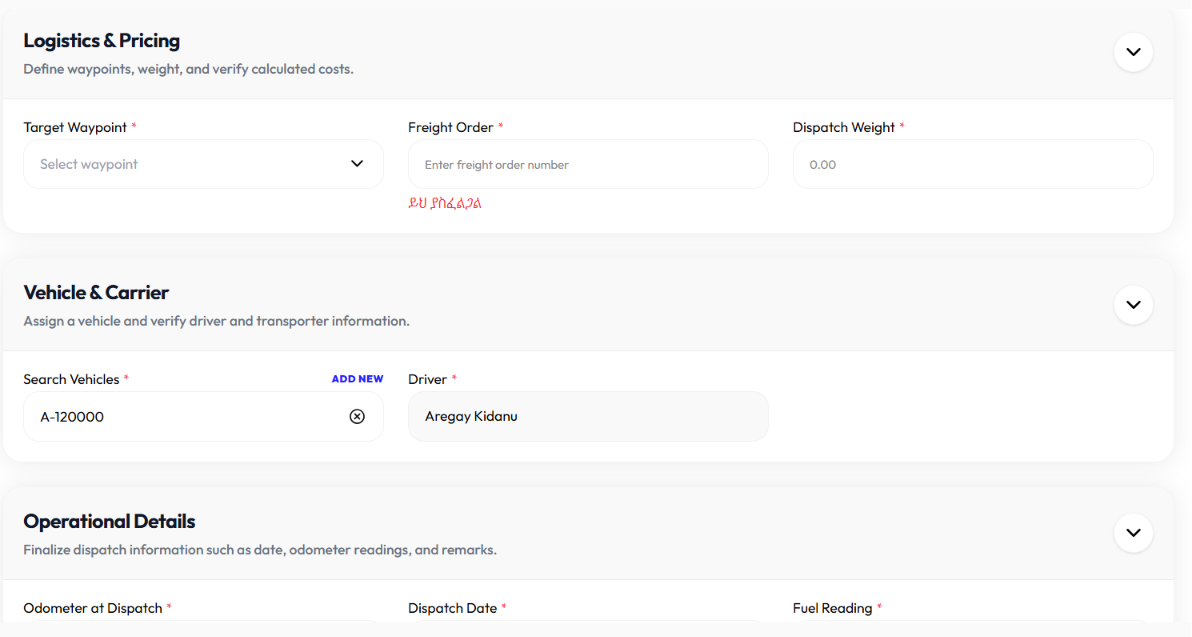
- Enter target waypoint
- Enter freight order
- Enter dispatch weight
- Select vehicle
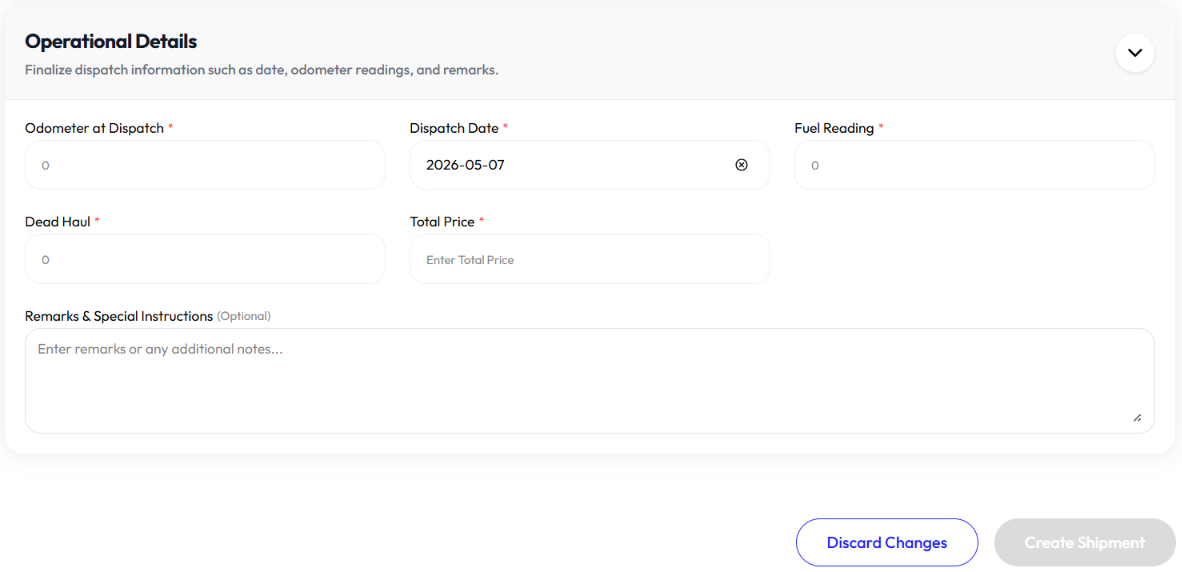
- Enter odometer at dispatch
- Enter dispatch date
- Enter fuel reading
- Enter dead haul
- Enter total price
- Enter remarks (optional)
- Click create shipment
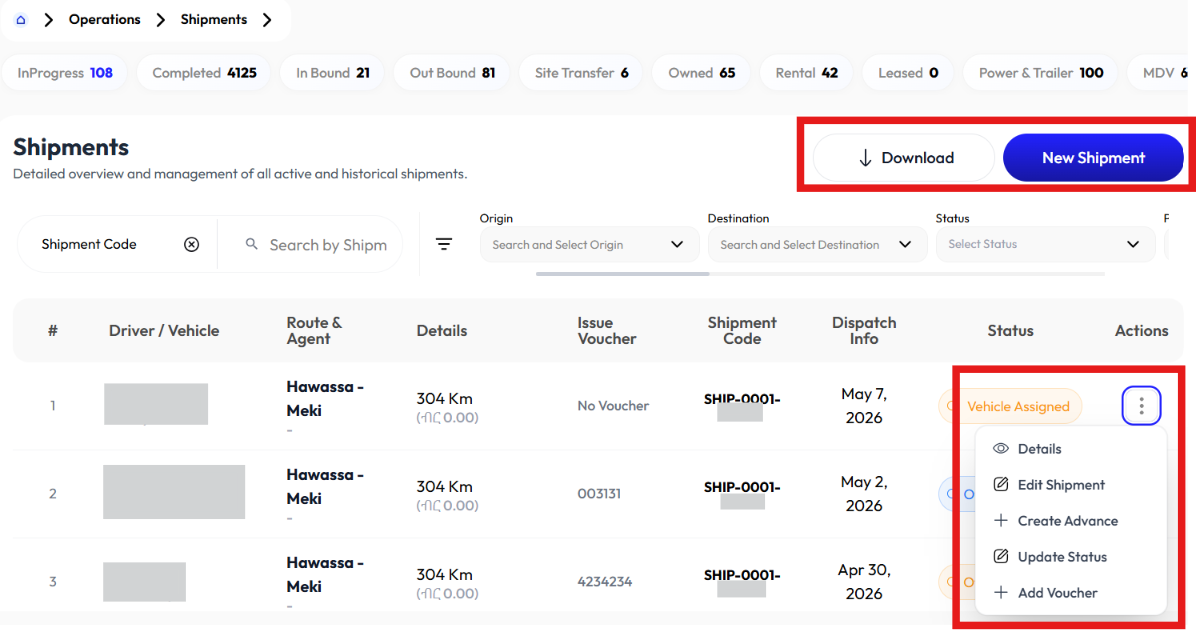
Shipments
- User adds shipments using the New Shipment button.
- User clicks on a shipment to display Detail.
- User changes status of shipments by clicking on Update Status.
- User modifies shipments by clicking on the Edit icon.
- User creates advance using the Create Advance button.
- User creates voucher using the Add Voucher button.
- User downloads information using the Download button.
- User searches for shipments by inputting the shipment code in the search bar
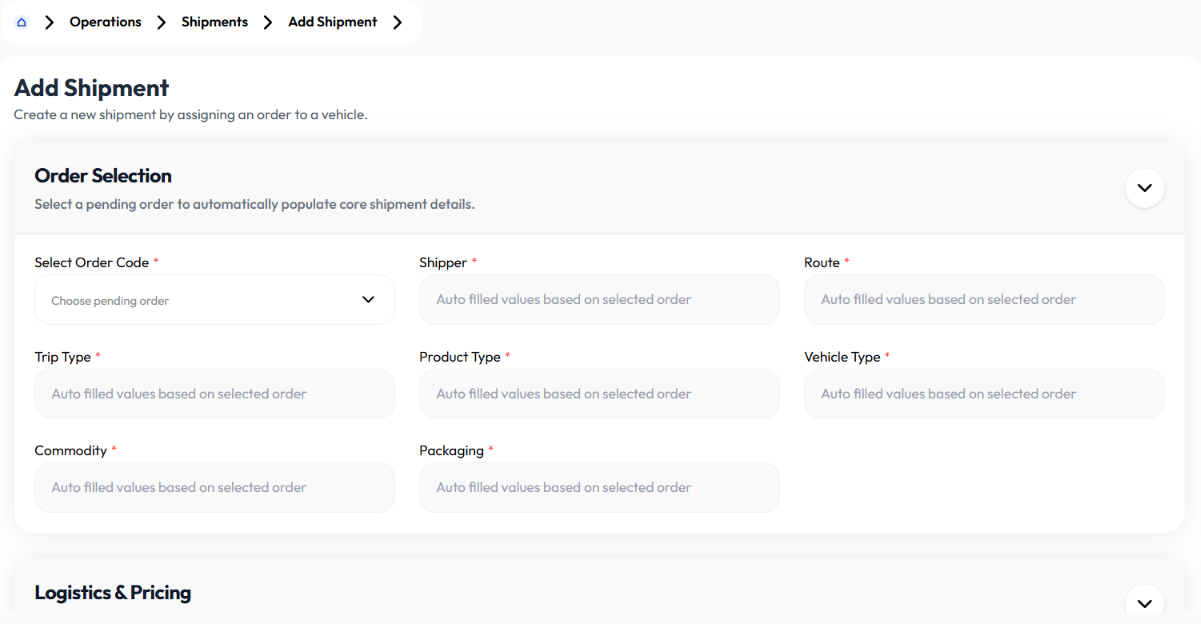
Add Shipment
- Click new shipment button
- Select order code. To add order check Add Order
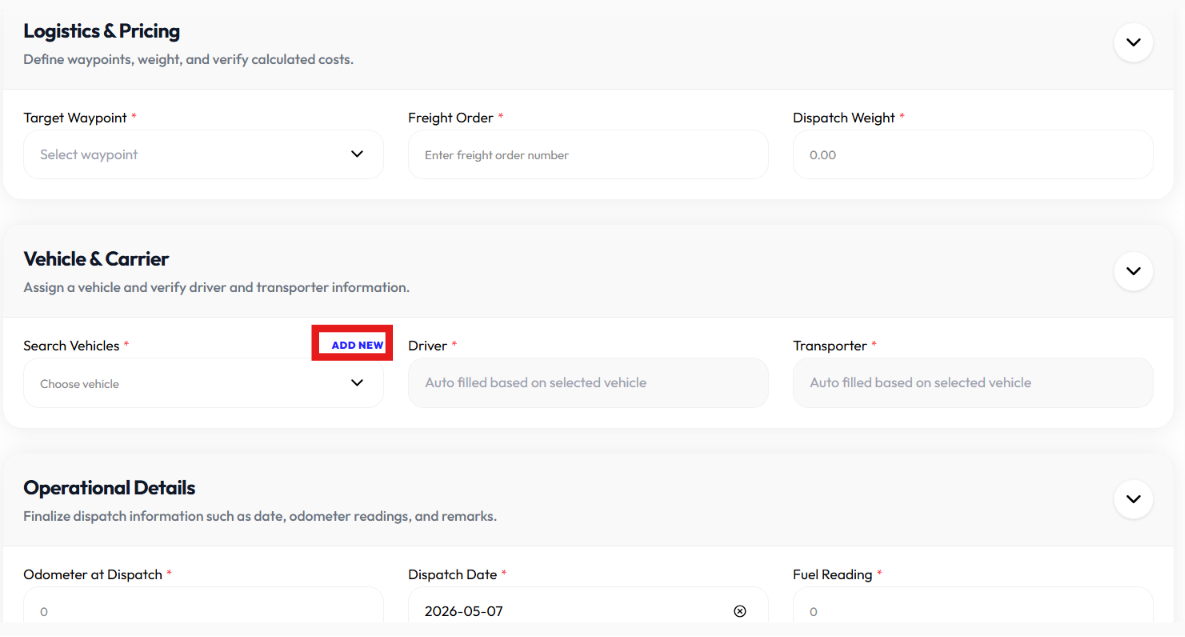
- Select waypoint
- Enter freight order
- Enter dispatch weight
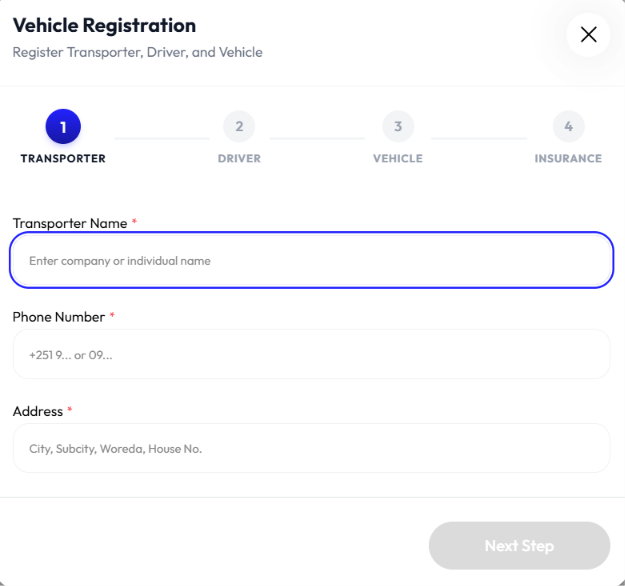
- Search vehicle, if you can't find vehicle:
- Click add new button to add a vehicle
- Enter transporter name
- Enter phone number
- Enter address
- Click next
- Enter driver first name
- Enter driver middle name
- Enter last name (optional)
- Enter phone number
- Select transporter
- Enter driver license number (optional)
- Click next
- Enter plate number (optional)
- Enter trailer plate (optional)
- Select vehicle type
- Click next
- Select insurance provider
- Enter prepayment start date
- Enter prepayment mature date
- Enter JV
- Enter CPV
- Enter withhold tax
- Enter total
- Click complete registration
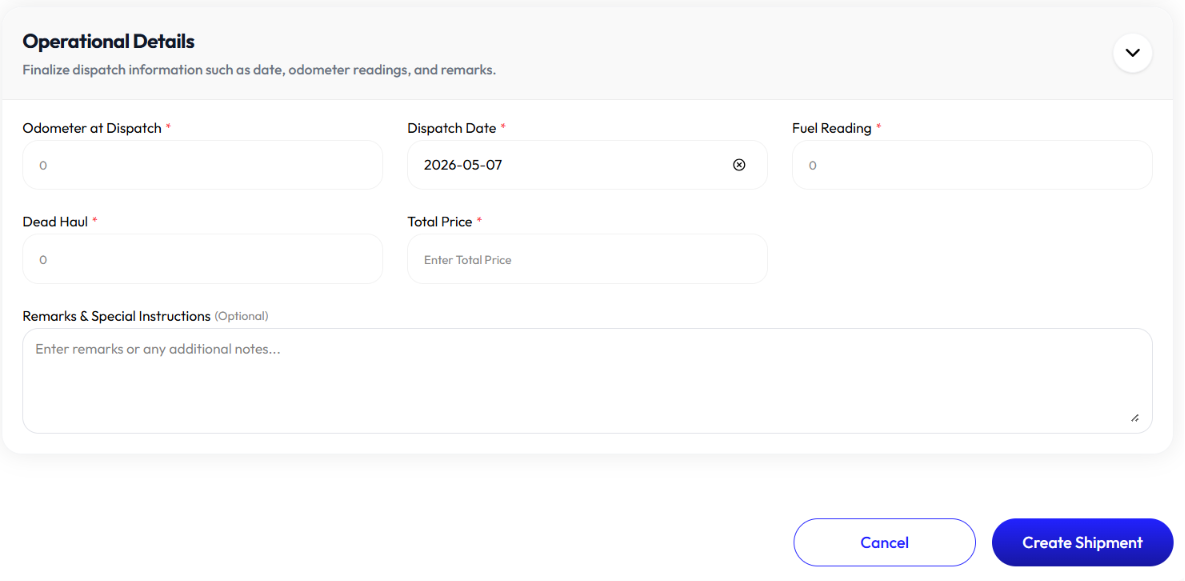
- Enter odometer at dispatch
- Enter dispatch date
- Enter fuel reading
- Enter dead haul
- Enter total price
- Enter remark (optional)
- Click create shipment
Detail Shipment
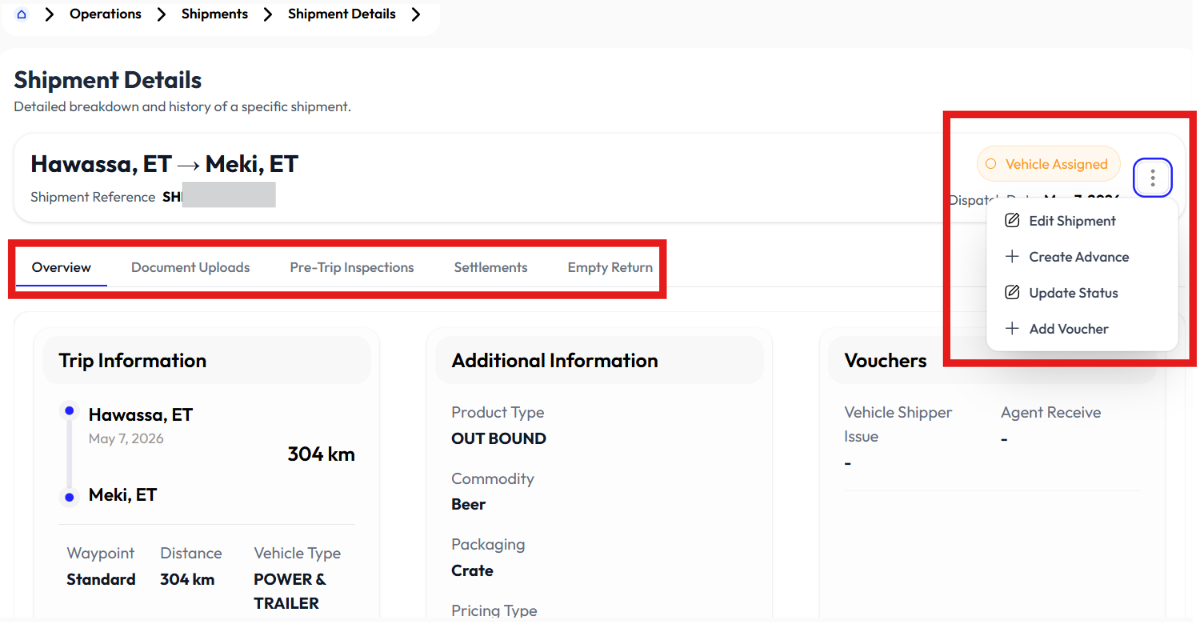
- Click action button
- Click details
- Click overview, document uploads, pre-trip inspections, settlements, empty return
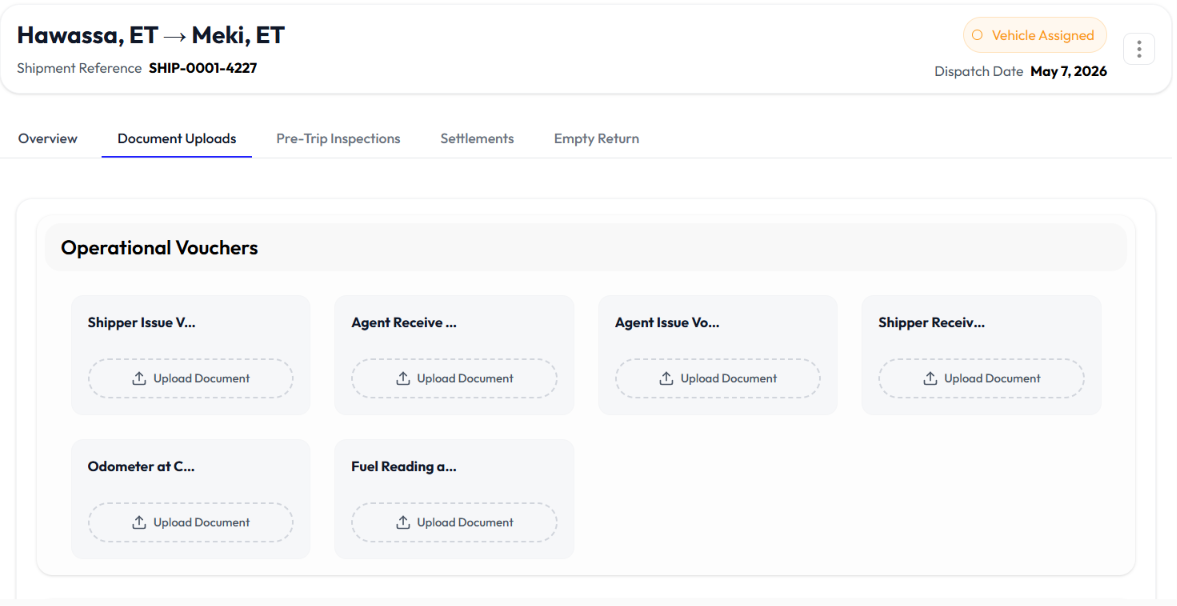
- Document uploads
- Upload operational vouchers
- Upload closing documents
- Upload other shipment documents
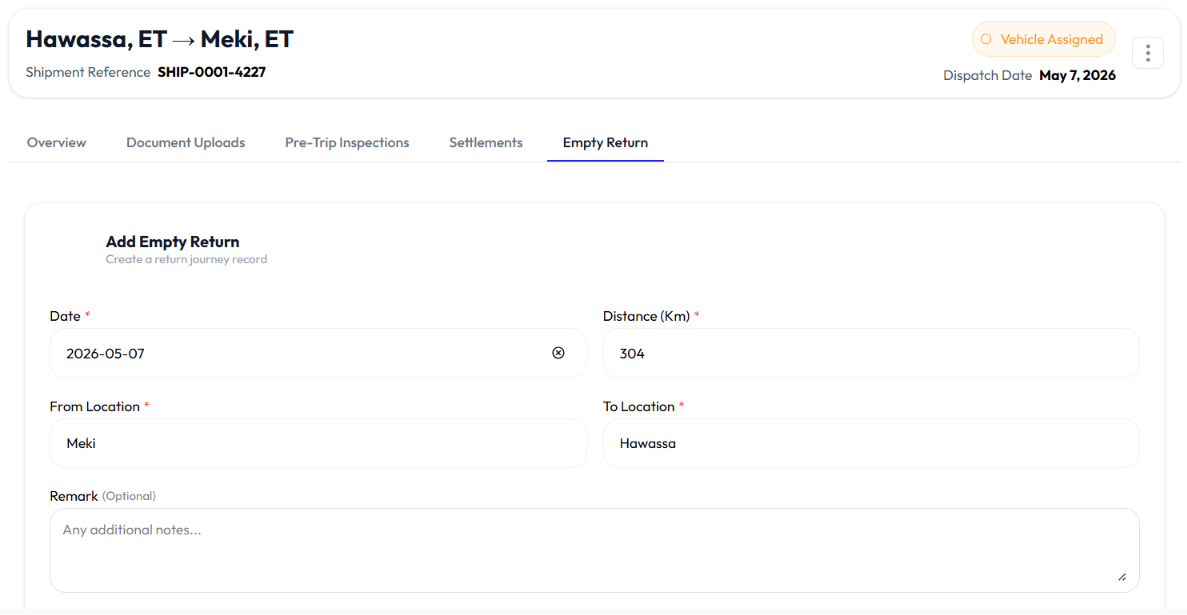
- Empty return
- Click add empty return button
- Enter date
- Enter distance
- Enter from
- Enter to location
- Enter remark (optional)
- Click save
Update Status
- Click action button
- Click update status
- Select shipment status
- Enter time
- Click save

Edit Shipment
- Click action button
- Click edit
- Select order code. To add order check Add Order
- Select waypoint
- Update freight order
- Update dispatch weight
- Search vehicle, if you can't find vehicle:
- Click add new button to add a vehicle
- Enter transporter name
- Enter phone number
- Enter address
- Click next
- Enter driver first name
- Enter driver middle name
- Enter last name (optional)
- Enter phone number
- Select transporter
- Enter driver license number (optional)
- Click next
- Enter plate number (optional)
- Enter trailer plate (optional)
- Select vehicle type
- Click next
- Select insurance provider
- Enter prepayment start date
- Enter prepayment mature date
- Enter JV
- Enter CPV
- Enter withhold tax
- Enter total
- Click complete registration
- Update odometer at dispatch
- Update dispatch date
- Update fuel reading
- Update dead haul
- Update total price
- Update remark (optional)
- Toggle CKRF
- Enter CKRF code
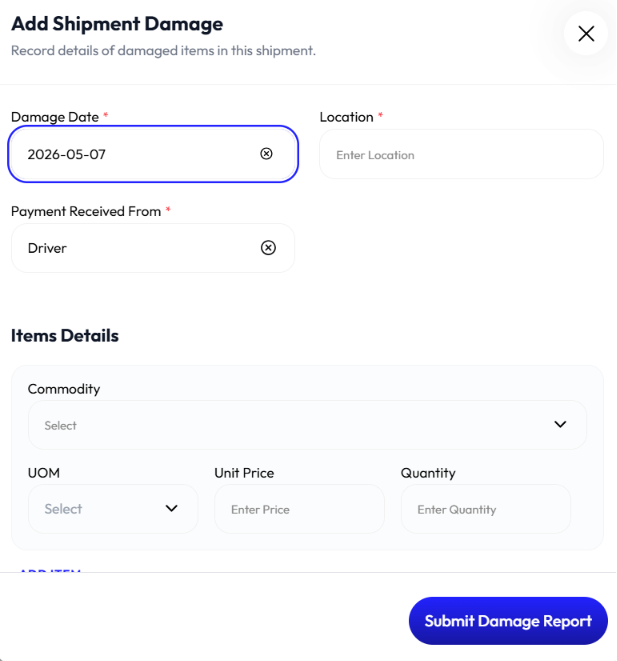
- Toggle is damaged
- Enter damage date
- Enter location
- Select payment received from (driver, insurance, transporter, third party)
- Select commodity
- Select UOM
- Select unit price
- Select quantity
- Click add item to add more than one commodity item
- Toggle vat inclusive or not
- Enter remark (optional)
- Click submit damage report
- Click create shipment

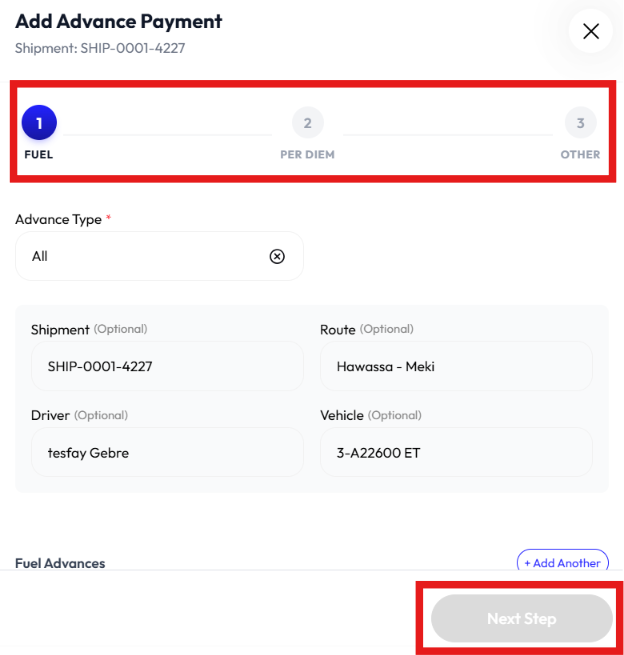
Create Advance
- Click action button
- Click create advance
- Select advance type (fuel only, all)
- Enter shipment (optional)
- Enter route (optional)
- Enter driver (optional)
- Enter vehicle (optional)
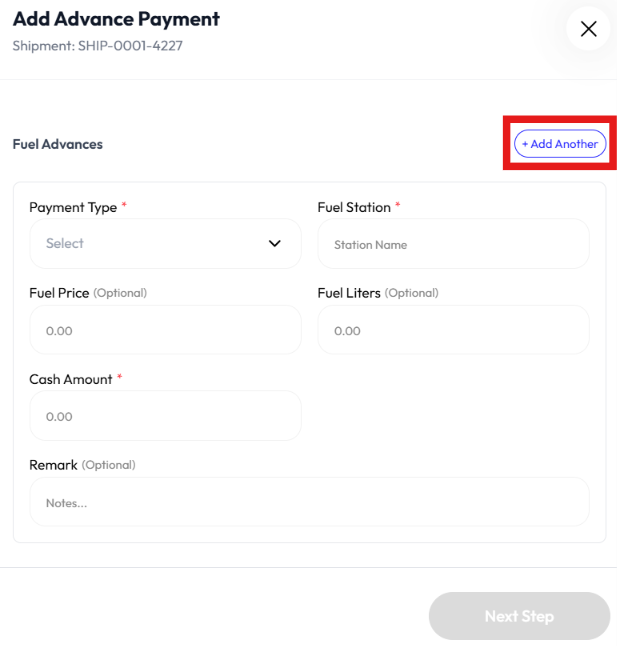
- Select payment type (cash, telebirr, voucher)
- Enter fuel station
- Enter fuel price (optional)
- Enter fuel liters (optional)
- Enter cash amount
- Enter remark (optional)
- Click add another to add more fuel advance
- Click next
- Select category (based on days drive, based on weight)
- Enter amount
- Enter remark (optional)
- Click next
- Select reason
- Enter amount
- Enter remark (optional)
- Click Complete
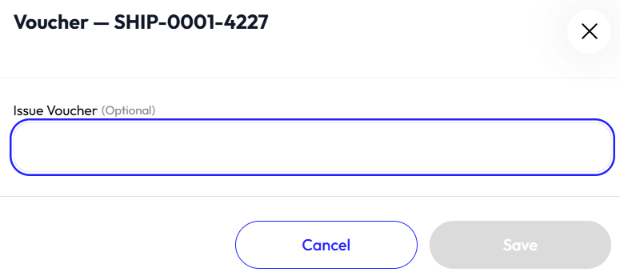
Add Voucher
- Click action button
- Click add voucher
- Enter issue voucher (optional)
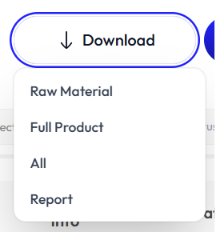
Download Shipment
- Click download button
- Select:
- Raw material
- Full product
- All
- Report
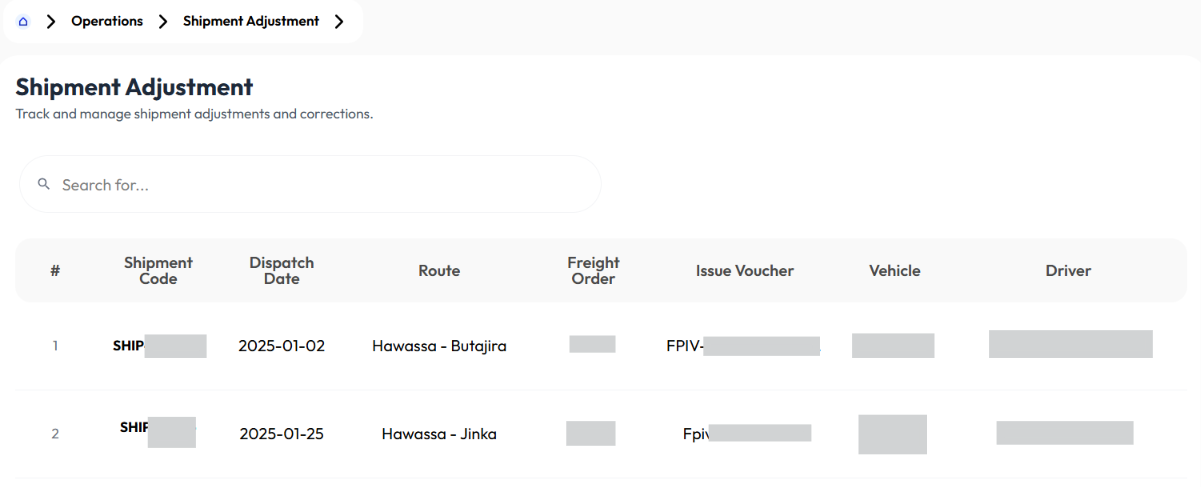
Shipment Adjustment
- User displays information using Details
- User searches for adjustment using the search bar
Shipment Adjustment Details
- Click on a shipment adjustment
- Click on overview, document uploads, pre-trip inspections, settlements, empty return
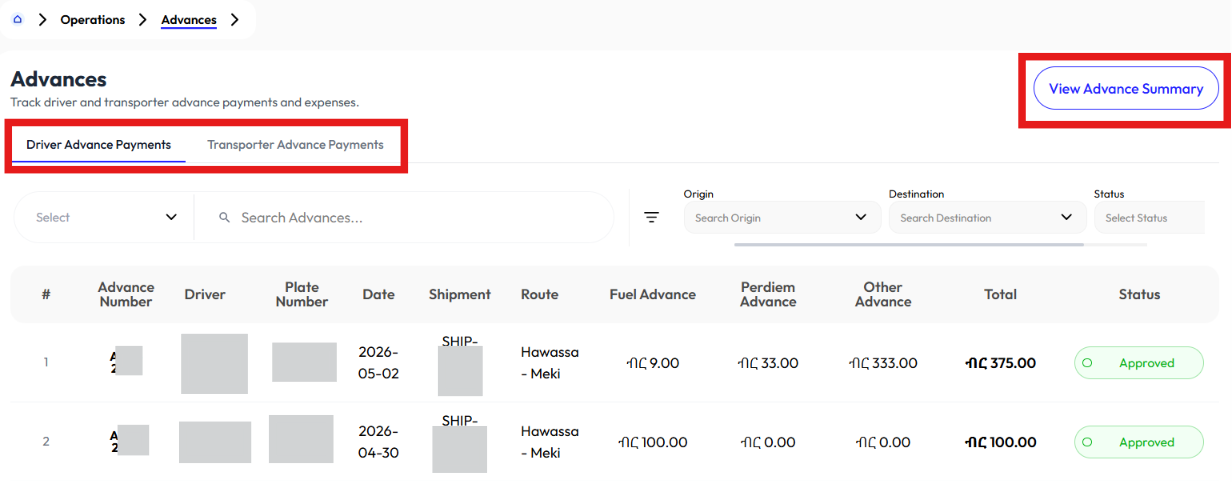
Advances
Driver Advance Payments
- User views advance summary using the View Advance Summary button.
- User clicks on an item to display Details.
View Advance Summary
- Click view advance summary button
- Select items from the list
- Click print

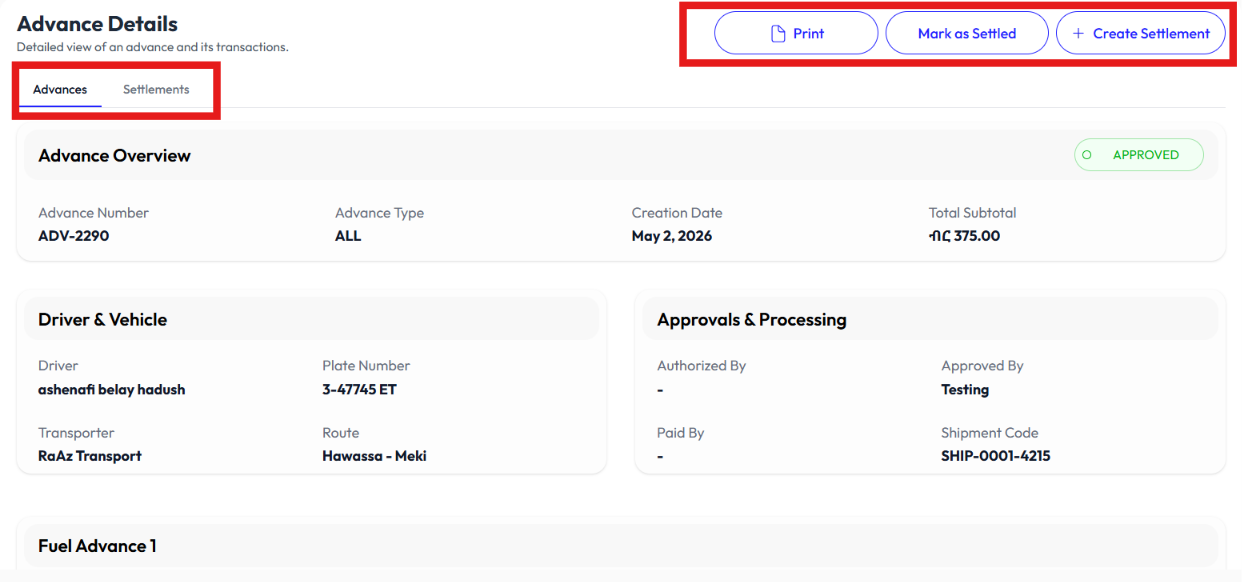
Driver Advance Payment Details
- Click on advance payment from the list
- Click print
- Click mark as settled to mark it settled
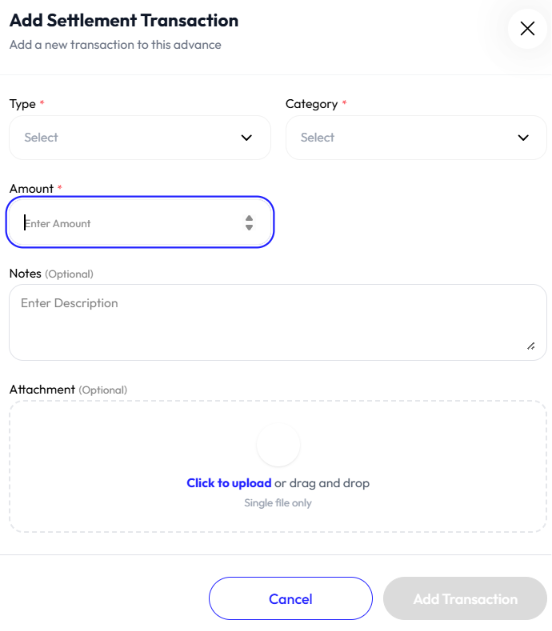
- Click create settlement
- Select type
- Select category
- Enter amount
- Enter note (optional)
- Upload attachment (optional)
- Click add settlement transaction
Transporter Advance Payments
- User creates summary using the View Pre-Payment Summary button.
- User clicks on an item to display Details.
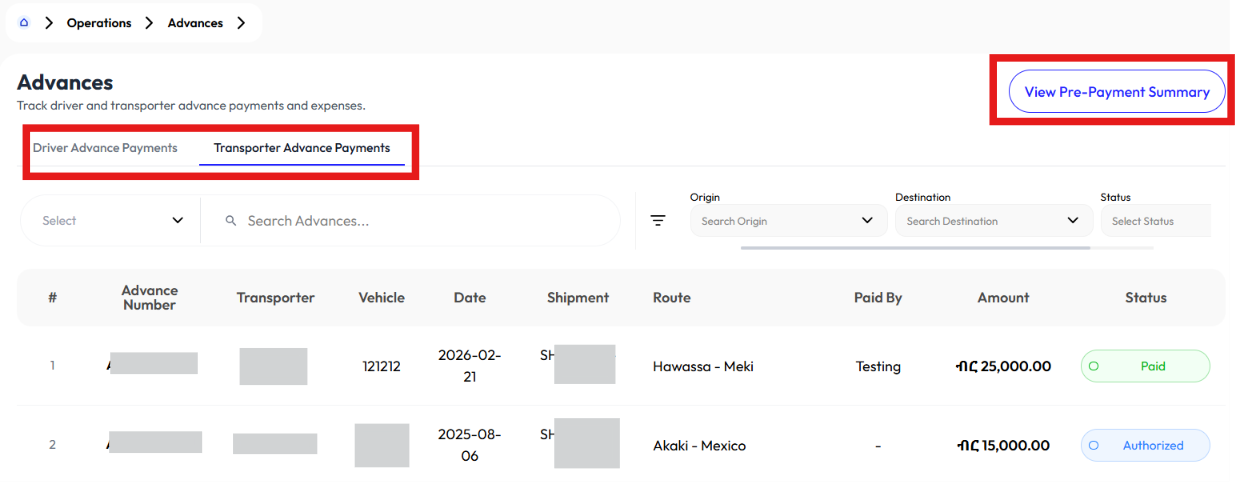
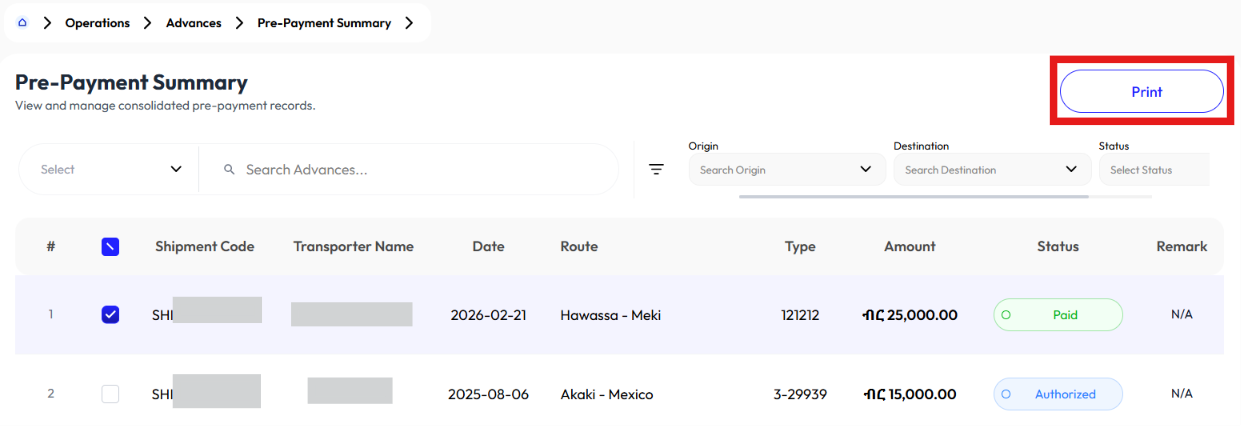
View Pre Payment Summary
- Click view pre payment summary button
- Select items from the list
- Click print
Transporter Advance Payment Details
- Click on advance payment from the list
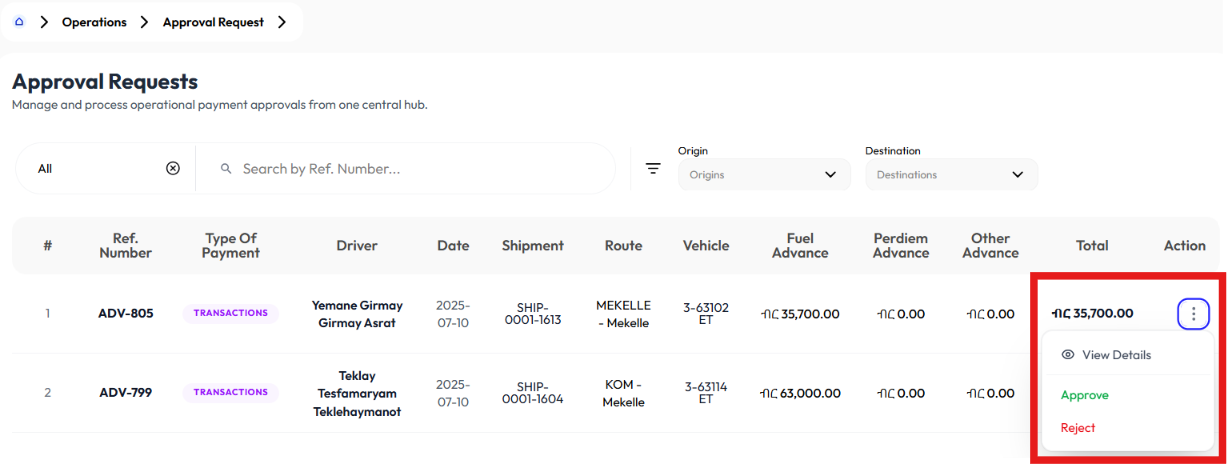
Approval Requests
- User clicks on a request to display Details.
- User approves or rejects a request by clicking on Approve or Reject buttons.
Approval Request Details
- Click action button
- Click detail
- It will take you to Advance Detail
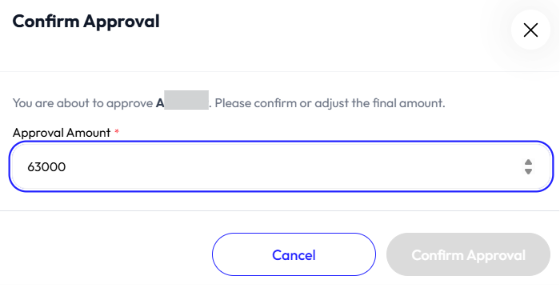
Approve Request
- Click action button
- Click approve
- Enter approval amount
- Click confirm approval
Reject Request
- Click action button
- Click reject
- Click yes
Settlements
- User clicks on a settlement to display Detail
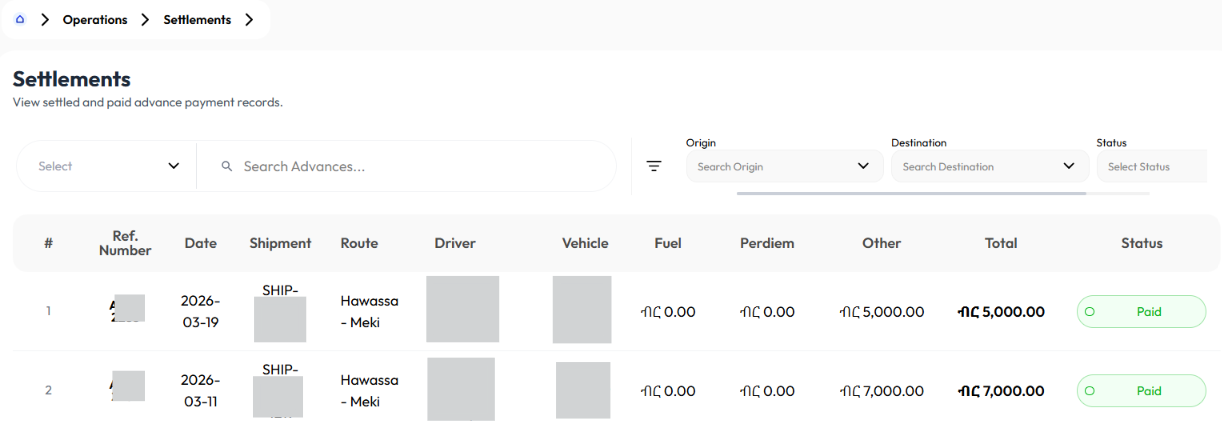
Settlement Detail
- Click on an item from the list
- It will take you to Advances
Aggregated Advances
- User clicks on an item to see Details

Detail Aggregated Advance
- Click on an item from the list
- It will take you to Advances